golang-migrateとは
Golangのプロジェクトにおいてマイグレーションファイルを作成したり、管理したいすることができるライブラリです。
ドキュメントはこちらのGithubページになります。(https://github.com/golang-migrate/migrate)
golang-migrate導入前のシチュエーション
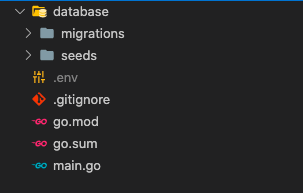
まず前提の状況として、ルートパスにdatabaseフォルダとその配下にmigrationsフォルダ・seedsフォルダを用意します。(ここではmigrationsフォルダしか使わないので、seedsは無くても大丈夫です)

golang-migrationをインストールする
Macを使用しているならhomebrewからインストールできます。
$ brew install golang-migrateWindowsユーザーであれば以下のコマンドでインストールが可能です。
$ scoop install migrateインストールしたらhelpオプションをつけてmigrateコマンドを使用してみます。
$ migrate -help

Usage: migrate OPTIONS COMMAND [arg...]
       migrate [ -version | -help ]

Options:
  -source          Location of the migrations (driver://url)
  -path            Shorthand for -source=file://path
  -database        Run migrations against this database (driver://url)
  -prefetch N      Number of migrations to load in advance before executing (default 10)
  -lock-timeout N  Allow N seconds to acquire database lock (default 15)
  -verbose         Print verbose logging
  -version         Print version
  -help            Print usage

Commands:
  create [-ext E] [-dir D] [-seq] [-digits N] [-format] [-tz] NAME
	   Create a set of timestamped up/down migrations titled NAME, in directory D with extension E.
	   Use -seq option to generate sequential up/down migrations with N digits.
	   Use -format option to specify a Go time format string. Note: migrations with the same time cause "duplicate migration version" error.
           Use -tz option to specify the timezone that will be used when generating non-sequential migrations (defaults: UTC).

  goto V       Migrate to version V
  up [N]       Apply all or N up migrations
  down [N] [-all]    Apply all or N down migrations
	Use -all to apply all down migrations
  drop [-f]    Drop everything inside database
	Use -f to bypass confirmation
  force V      Set version V but don't run migration (ignores dirty state)
  version      Print current migration version

Source drivers: godoc-vfs, gcs, bitbucket, github, gitlab, file, s3, github-ee, go-bindata
Database drivers: neo4j, sqlserver, firebirdsql, mongodb+srv, firebird, mongodb, postgres, postgresql, stub, cockroach, crdb-postgres, redshift, spanner, cockroachdb, mysql, pgx, cassandra, clickhouse
上記のようにgolang-migrateのコマンドの使い方が表示されれば、問題なくインストールできてます。
migrationファイルを作成する
golang-migrateでマイグレーションファイルを作成するには、基本的には以下の形式でコマンドを実行します。(今回はPostgreSQLを使用してます)
$ migrate create -ext sql -dir マイグレーションファイルの置き場 マイグレーションファイルの名前今回は、databaseフォルダ直下のmigrationsフォルダの中に作成します。また、usersテーブルを作るマイグレーションファイルにしたいので名前は「create_users_table」とします。
$ migrate create -ext sql -dir database/migrations/ create_users_table

/Users/golang_pj/database/migrations/20211205022034_create_users_table.up.sql
/Users/golang_pj/database/migrations/20211205022034_create_users_table.down.sql
上記のように、upとdownそれぞれのファイルが作成されると思います。
migrationファイルをDBに反映させる
upファイルの反映
upファイルに以下のようなSQLを記述します。(使用するDBはPostgreSQLです。)
内容としては、nameカラムとemailカラムを持ったusersテーブルを作成するだけのシンプルなものです。
CREATE TABLE IF NOT EXISTS users
(
    id serial,
    name varchar(50) NOT NULL,
    email varchar(256) NOT NULL,
    created_at timestamp with time zone NOT NULL,
    updated_at timestamp with time zone NOT NULL,
    PRIMARY KEY (id)
);
また、downファイルには逆にusersテーブルを削除する内容を記述します。
DROP TABLE IF EXISTS users;これでSQLの用意はできたのでマイグレーションを実行し、データベースの方に反映させてあげたいと思います。
使用しているDBがPostgresなので以下の形式でコマンドを実行することができます。末尾の数字は反映させるマイグレーションファイルの数を表します。
$ migrate -database="postgres://ユーザー名:パスワード@ホスト名:ポート番号/データベース名?sslmode=disable" -path=database/migrations/ up 1今回は以下の条件でコマンドを実行します。
- DB名:golang_pj_db
- user名:test_user
- パスワード:password
- ホスト名:localhost
- ポート番号:5432
$ migrate -database="postgres://test_user:password@localhost:5432/golang_pj_db?sslmode=disable" -path=database/migrations/ up 1
20211205022034/u create_users_table (11.796858ms)
上記のように、特にエラー等が表示されなければ上手く行ってますね。
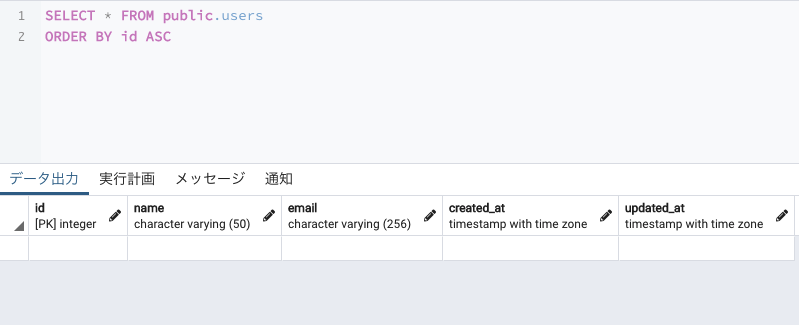
データベースの中身を除いて確認してみるとマイグレーションファイルに書いたusersテーブルが作成されたのが分かります。

テーブルを展開してみると期待通りのカラムが作成されてますね。

downファイルの反映
それでは最後にdownファイルの方も反映させて、upファイルが反映される前の状態(usersテーブルが存在しない状態)に戻します。
確認となりますが、downの内容は以下のとおりです。
DROP TABLE IF EXISTS users;実行するコマンドはupの時とほとんど同じで、以下の通りです。
$ migrate -database="postgres://test_user:password@localhost:5432/golang_pj_db?sslmode=disable" -path=database/migrations/ down 1
20211205022034/d create_users_table (15.703303ms)
上記のようにエラー等が出てなければ、usersテーブルは削除されているはずです。

再度データベースの中を確認しても、正常に削除されたことが分かります。

